How to Guide for Rotating Crops in the Vegetable Garden
Building naturally healthy soil is something our great-grandparents used to do. Before the introduction of pesticides and fungal sprays, our ancestors used to practice the good-old-fashioned art of crop rotation.
Having knowledge of what kinds of crops infect the soil; starve the soil; and naturally repair the soil, helped have generations of successful vegetable

Here is a guide for what to plant and what to skip so that you and your family can have all the benefits of home grown produce without the chemicals.
-
Step 1
Divide your garden into 4 planting beds, more if you have the space. The perfect size for 1 of these planting beds depends on what you are growing. An ideal size is 4 by 8 feet, which would be sweet. A bed doesn’t have to be that big for a lettuce garden (that would be a lot of lettuce). Corn needs a giant amount of room! 4 x 8 is pushing it because corn is wind pollinated and needs plenty of other corn plants to get enough pollination to produce ears. Ever notice those big farms growing corn? Pollination is why that outside row always looks short and stunted, so for you to grow corn… the bigger space the better.
-
Step 2
 Nightshade.
Group #1 The nightshades: Tomatoes, peppers, potatoes, and eggplants.
This family should stay together. Those nightshades have been responsible for some of the worst starvation incidents in history. They are the “mother load” for soil infections, pests, and disease. Grow them in your first bed and give them, at least, 3 years before you plant any nightshade vegetable in this dirt again. It has even been suggested that once a nightshade has been grown in this soil a nightshade should never be planted again. I can’t make this kind of stuff up, but if you are growing your veggies in containers, I think it would be wise to use that potting soil for growing flowers in after the vegetable harvest.
Before you plant anything, amend the soil! Tomatoes, peppers, and eggplants are pigs. They like lots of nitrogen and compost. Potatoes love the compost, but need less nitrogen to produce better roots. Calcium deficiency is common in our soils, add lime or gypsum just before planting but not at the same time you add the nitrogen (nitrogen neutralizes lime). So add the manure in the fall and the nitrogen fertilizers after the plants start to grow.
This would be a good bed to squeeze in some onions, garlic, leeks, and shallots. -
Step 3
 Peas & Carrots.
Group #2 The Legumes: Peas, beans, lentils, soybeans, peanuts, and cover crops (alfalfa, vetch, and clover). Plus: The Parsleys: Carrots, dill, coriander, parsnips, and of course parsley.
The Legumes are an interesting group of plants! They thrive in nutrient poor soil and they actually add nitrogen to the soil. This is a natural way to fix poor soil. The cover crops are commonly used to correct bad soil over the winter. Farmers plant the cover crop in fall, let it grow and add nitrogen to the soil all winter, and in early spring the cover crops get dug in several weeks before planting. Not only do those cover crops fix the soils nitrogen, but they keep weeds down and absorb excess moisture so that the soil can be worked earlier in the year.
Before you plant, don’t go adding a bunch of stuff to the dirt. The legumes like it lean and weed-free.
Then I added the Parsleys. Since the Legumes like a cool growing season, they’ll be harvested and cleared in time for a second crop of Parsleys. Parsleys are a light feeder and they thrive in summer heat. This family will appreciate the soil left by the Legumes and only take up a little of the nutrients before being harvested.
This would be the best bed to squeeze in some lettuce, spinach, chard, beets, and radishes. -
Step 4
 The harvest.
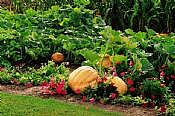
Group #3 The Cabbages: Cabbage, broccoli, cauliflower, brussel sprouts, collards, kale, and kohlrabi. Plus: The Cucurbits: Squash, pumpkins, melons, and cucumbers.
This is a vegetable bed that will need a lot of space. Limit and choose your plants carefully. If you had more than 4 beds, this would be a good group to split, but if you’re only working with 4 beds (like me), share. You can even trellis small squash and cucumbers to make space and most of the Cabbages will be grown and harvested before the Cucurbits really take over.
Before you plant anything, amend the soil with compost and nitrogen. These groups are heavy feeders. Give the Cucurbits plenty of space, crowding can lead to fungus. -
Step 5
 Just corn.
Group #3 The Corn: Not really a group, just the biggest space hog that you can plant.
This big-ol’ glutton for food and water needs as many individual plants that you can fit into this planting bed, according to the seed packet instructions for spacing. Wind pollinator have the best success with more plants for pollinating.
Here’s a little tip: instead of planting the entire bed all at once, which means all of that corn will be ripe at once. Divide the bed into 3 sections and plant one section of corn at a time, 2 weeks apart. This will give you your wind pollination and you won’t have to cook all of your corn in 1 week (since corn gets stale quickly).
Before you plant, this hungry crop needs its nitrogen and compost.
Some gardeners like to fit squash in between the rows of corn. This is a great space saver and it works if you plant the corn first, letting the corn get 6 inches tall. Then plant the squash seeds (seeds please, or the plants will quickly out grow the corn). -
Step 6
Grow, feed, water, and harvest.
Next year: rotate. Bed #1 becomes the Corn bed. Bed #2 is now the Nightshades. Bed #3: Legumes and Parsley. Finally Bed #4 is now Cabbages and Cucurbits.
Keep rotating every year.By GreenGardenChic
eHow Community Member


Crop Rotation